
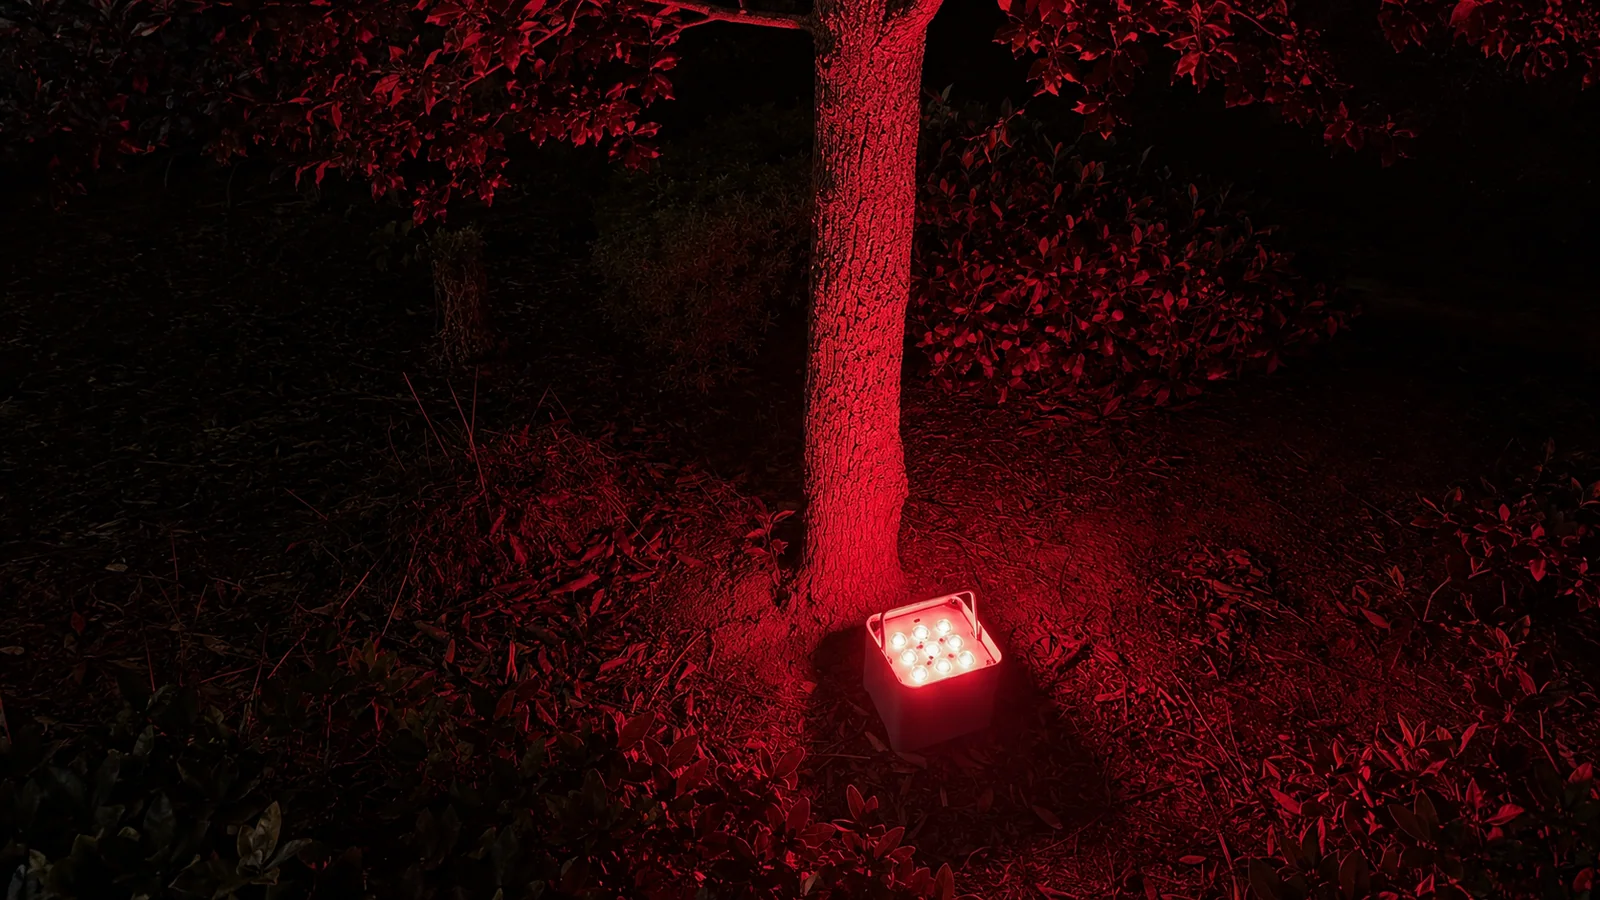
Quick Answer
Why do RGB LED lights create colored shadows? Red, green and blue emitters occupy different positions. When an object blocks one emitter but not the others, each shadow region receives a different color combination. Blocking red leaves green plus blue (cyan); blocking green leaves magenta; blocking blue leaves yellow. Wider spacing, short source-to-object distance, and large object-to-wall distance make separation easier to see. Interleaved packages, suitable lenses, mixing chambers, more mixing distance, or diffusion can improve overlap. Diffusion can also lower center illuminance and useful throw. This is optical geometry, not normally a wireless DMX fault.
Table of Contents
- What colored shadows are
- Why separate RGB emitters create multiple shadows
- LED spacing and package design
- Whether a higher LED count helps
- Why short throw reveals the problem
- Lenses and mixing chambers
- How diffusion helps
- Diffusion trade-offs
- PAR, panel and tube behavior
- Cause–observation–solution table
- Wall, person and camera test
- Crew solutions and product checks
- FAQs
- Related articles and next step
What Are Colored Shadows?
An opaque object creates a shadow by blocking light traveling to a surface. One small white source usually produces one dominant dark shadow. Several separated sources project offset shadows because the object blocks each path at a different angle.
In a full-color fixture, those source positions may also have different spectra. The U.S. Department of Energy explains that full-color-tunable products use three or more individually variable LED primaries, commonly red, green and blue with possible amber or white channels. If an object blocks only the red path, green and blue still reach part of the wall and create a cyan-looking region. The other complementary combinations create magenta and yellow fringes. Where several shadows overlap, the result becomes darker.
LED colored shadows are therefore a spatial effect, and the same physics underlies controlled multi-color shadow lighting used as a creative look.
This RGB LED color separation is not poor light color consistency. Consistency asks whether fixtures or beam areas produce the same integrated color. Separation asks whether one mixed setting remains spatially mixed after an object blocks emitter paths. Fixtures can match on an open wall and still create short-throw color fringes.
DMX selects channel levels; it cannot collapse separated dies into one point. A wrong personality can command the wrong color, but repeatable fringes that move with source geometry are optical clues. The DMX color consistency guide covers whole-fixture and batch mismatch.
Why Separate Red, Green and Blue Emitters Create Multiple Shadows
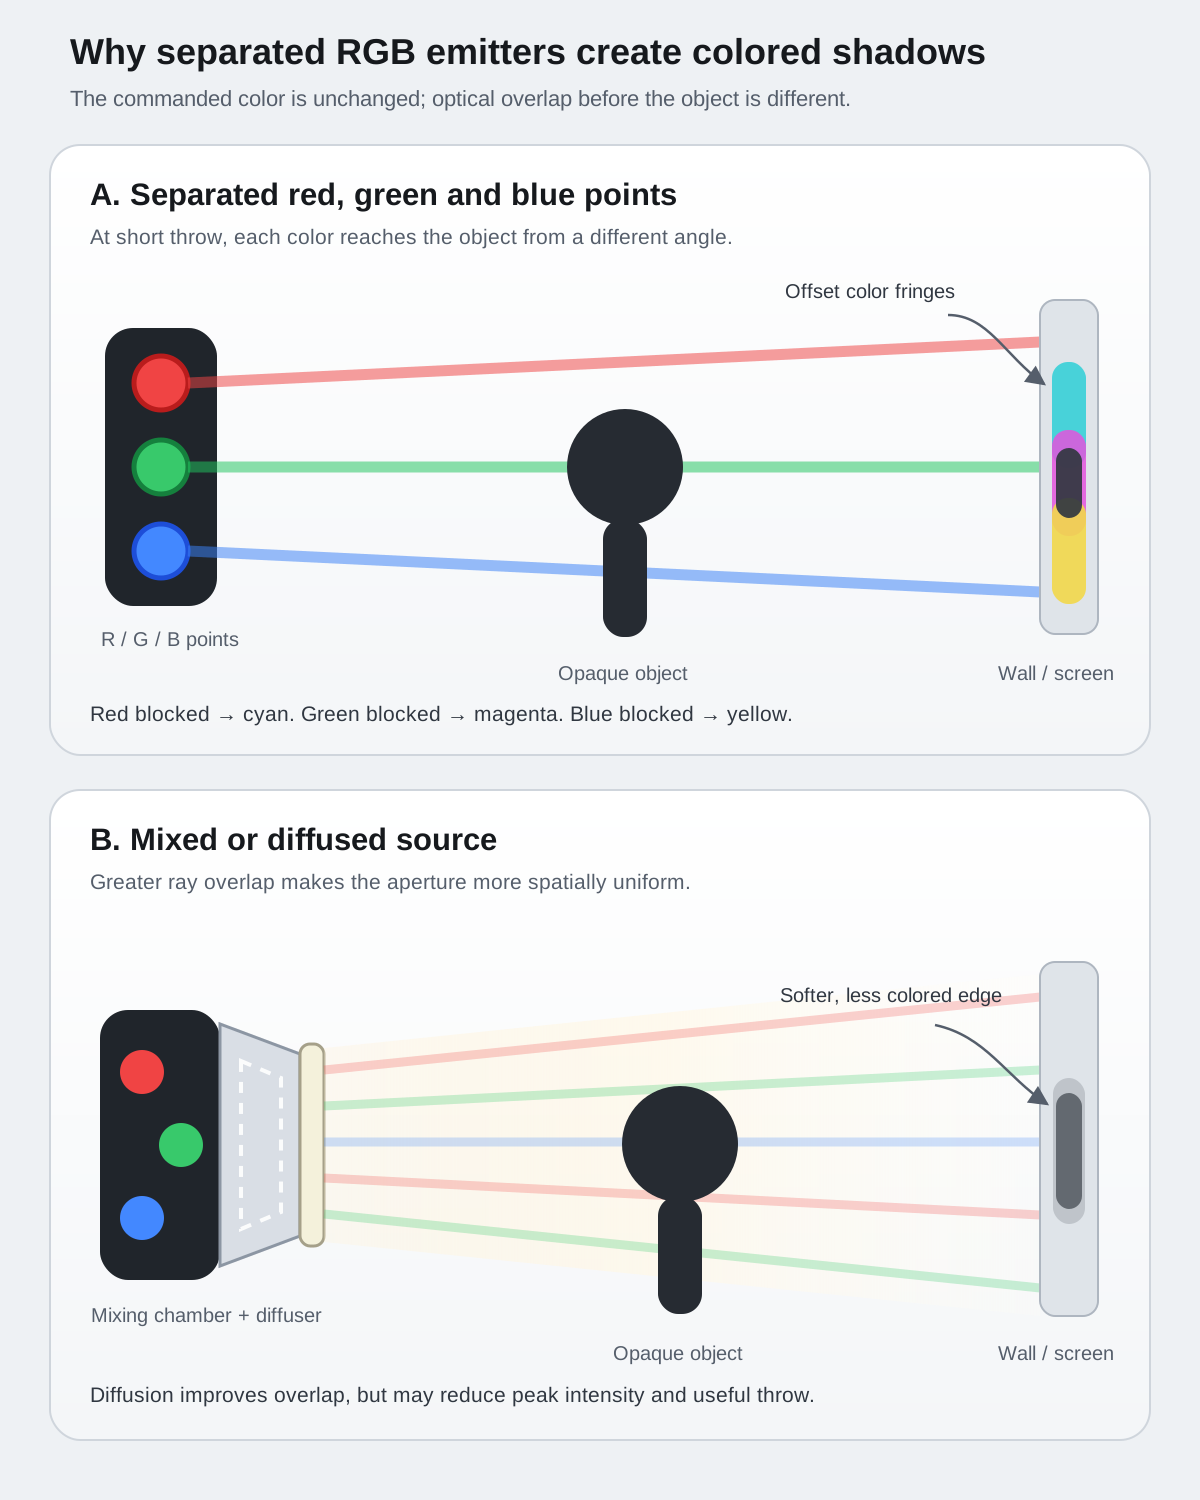
Imagine three small lamps in a row: red, green and blue. Because they are not co-located, each sees a person from a slightly different angle and projects a shadow in a different wall position.
The visible color in any region is the sum of the paths that remain:
- Red blocked, green and blue present: cyan shadow fringe.
- Green blocked, red and blue present: magenta shadow fringe.
- Blue blocked, red and green present: yellow shadow fringe.
- All three substantially blocked: a dark central overlap.
Real multi-emitter LED optics are more complex: dies have area, lenses redirect rays, other channels may contribute, and soft edges overlap. Fringes may appear around hands, hair, furniture, foliage, stands, truss, or décor rather than as perfect silhouettes.
The diagram shows the principle, not measured fixture performance. “Less colored” is deliberate: no diffuser guarantees uniformity at every angle and distance.
How LED Spacing and Package Design Affect Mixing
Emitter spacing sets the starting parallax. Large gaps between color centers create larger angular differences at the object. Closer spacing makes the primaries behave more like one source, but die size, lens shape, recess depth, reflectors, diffuser position, and viewing angle still matter.
Closely mounted dies inside one package can reduce separation versus widely spaced single-color packages, but the dies still have finite spacing and a lens may steer them differently. Separate packages can also mix well when tightly interleaved with overlapping optics.
A panel with red emitters on one side and blue on the other can form a gradient even when average output is correct. Research on LED array configuration and lens optimization supports the broader principle: color uniformity depends on both arrangement and optical design.
Does a Higher LED Count Improve Color Mixing?
Not automatically. More emitters can add overlap when colors are closely interleaved and shaped by suitable optics. They can also add shadow paths, lens images, or repeated bands.
A compact nine-emitter array may outperform eighteen emitters arranged in separate color rows. The opposite is possible if the larger array has tighter spacing, better optics, and an effective mixing chamber.
Evaluate color-center pitch, grouping, package, lens, diffuser, aperture, and real distances—not count alone. The RGBW vs RGBWW vs RGBWA+UV guide similarly explains why more channels do not guarantee better light.
Battery light color uniformity must be tested across the emitting area and at the intended distance; the diode total alone does not establish uniformity.
Mixing Distance: Why Problems Are More Visible at Short Throw
Mixing distance is the distance needed for the colored distributions to overlap enough for a defined target. No universal “one metre” rule exists; emitter pitch, optics, aperture, diffuser, target, and acceptance threshold all change it.
Short throw increases the angle between emitters as seen from the object. Moving the fixture back reduces that angle. Moving a person farther from the wall spreads the projected offsets; moving the person close compresses them. An empty wall can therefore look uniform until someone enters the beam and reveals stage light color shadows.
Research on short-distance LED color mixing notes the need for secondary optics and mixing distance. Mark the fixture-to-subject and subject-to-background distances that pass instead of borrowing another product’s number.
Lenses, Mixing Chambers and Optical Design
A lens can collimate, spread, redirect, or scramble rays. Ask whether the complete optics overlap every color across the required field and distance.
Designs may use a common lens, one lens per package, or far-field overlap. Mixing chambers add reflections that reduce the spatial memory of each color’s origin. Light pipes, faceted surfaces, reflectors, and freeform optics provide other trade-offs in size, efficiency, thermal design, and distribution control.
An even empty-wall patch can still form colored shadows around an object. Test both open-beam uniformity and occlusion. For coverage data, use the floodlight beam-angle and diffuser guide instead of treating mixing as a beam-width calculation.
How Diffusers Reduce Color Separation
A diffuser scatters rays over more directions, helping each color occupy the same outgoing angles and making the aperture appear more continuous. Hotspots, lens images, and RGB LED shadow problem fringes can soften.
Position and structure matter. Near-source diffusion can overlap colors before exit; a front diffuser can enlarge the apparent source and soften shadows. A weak cosmetic cover may hide glare without enough short-throw mixing.
Edmund Optics’ diffuser overview describes spreading light to reduce bright spots and notes scattering loss depends on substrate. In LED diffuser color mixing, “frosted” is therefore incomplete: request the material, transmission, distribution, retention, and complete-fixture results.
Diffusion Trade-Offs: Output, Throw and Beam Control
Diffusion redistributes light and can absorb or reflect part of it. Effects may include lower center illuminance, reduced useful throw, softer edges, more spill, and less precise control.
The penalty is product-specific. Compare standard and diffused configurations at the same color, level, battery state, distance, meter position, camera settings, and thermal condition.
Diffusion may suit close scenic fill; the standard optic may suit longer throw. Use the beam-angle guide for distribution checks.
PAR vs Panel vs Tube Color-Mixing Behavior
| Fixture format | Typical optical behavior | Where separation may appear | Neutral evaluation point |
|---|---|---|---|
| PAR | Compact round or square aperture with individual or grouped lenses | Crisp color fringes around nearby people, stands, décor, or foliage when the primaries remain distinct | Inspect the package grouping, common or individual lenses, diffuser option, and minimum tested throw |
| Panel | Larger emitting area with many packages; naturally softer shadows but more spatial samples | Lens images, multiple soft shadows, or gradients if colors are segregated across the panel | Check color arrangement across both axes and test with and without the specified diffuser |
| Tube | Long linear source, often behind a continuous cover | Directional color bands or repeated shadows close to walls and subjects | Rotate the tube, test along and across its long axis, and inspect the internal spacing and diffusion |
These are tendencies, not rankings. Format alone does not establish capability.
Cause–Observation–Solution Table
| Cause | What you may observe | How to confirm | Practical response |
|---|---|---|---|
| Widely separated RGB points | Cyan, magenta, and yellow fringes | Place one opaque object in RGB light; move the fixture | Increase source-to-object distance; reduce object-to-wall distance; try the approved optic |
| Colors grouped in rows or zones | Directional tint or repeated bands | Rotate the fixture 90° | Reorient or select a more interleaved layout |
| Insufficient mixing distance | Empty wall looks acceptable, but a nearby person creates strong fringes | Move only the fixture farther from the subject | Mark a minimum working distance for that scene |
| Weak or absent diffusion | Lenses remain visible; edges stay saturated | Compare documented configurations | Install the approved diffuser or another tested optic |
| Heavy diffusion | Softer, cleaner shadow but noticeably lower center lux or reach | Meter both configurations at identical settings | Reserve diffusion for close work or increase fixture quantity/position within the approved plan |
| Dirty, damaged, or mismatched cover | One unit has asymmetric tint or blur | Clean and compare identical parts | Standardize, repair, or replace the optical part |
| Whole beam differs between fixtures | The entire wall patch changes hue, not only shadow edges | Remove the object and compare units under controlled conditions | Use the color consistency diagnostic; do not treat it as shadow geometry |
How to Test a Fixture on a Wall, Person and Camera
- Use a matte neutral wall and control ambient light. Mark the fixture, subject, camera, and wall positions.
- Confirm the intended DMX personality, channel values, diffuser, lens, dimmer level, battery state, and thermal stabilization.
- Run red, green, and blue separately to identify their spatial paths, then run the intended mixed color.
- Place a small opaque object in the beam. Photograph its shadow with locked exposure and white balance.
- Repeat with a person at the real blocking position. Check hands, hair, face edges, clothing, and the background.
- Change only source-to-person distance, then only person-to-wall distance. Record when the fringes become acceptable.
- Repeat with the production camera, frame rate, shutter, picture profile, and display path. Camera tests can reveal separation that an adapted eye overlooks.
- Compare the standard optic and the approved diffuser without changing the other variables. Record center and edge illuminance if output matters.
- Repeat on several production units. Separate a shared optical behavior from one damaged or mismatched fixture.
This is not a CRI, TLCI, TM-30, flicker, or batch-chromaticity test. Use the CRI, R9, TLCI and TM-30 guide for rendition and camera evidence.
Practical Solutions for Event Crews
- Move the fixture farther from the person, scenic object, or foliage when placement permits.
- Move the subject closer to the background to compress offset shadows.
- Fit only the documented diffuser or LED color mixing lens and re-check output and spill.
- Re-aim or rotate a panel or tube when its emitter layout creates directional bands.
- Use two softer positions instead of one close, highly separated source when the scene and rigging plan allow.
- Keep people out of a decorative wall beam if the fixture is intended only for surface color.
- Save a tested scene card with distances, optics, channel values, camera settings, and pass/fail photographs.
- Do not chase an optical separation pattern by changing wireless transmitters or applying undocumented RGB offsets.
What to Check During Product Evaluation
- Physical location and pitch of red, green, blue, white, amber, or UV emitters.
- Multi-die versus separate packages and whether colors are interleaved or zoned.
- Common lens, lens-per-emitter, mixing chamber, light pipe, reflector, and diffuser configuration.
- Open-beam color uniformity plus colored-shadow performance at the shortest planned throw.
- Center and edge illuminance with and without the diffuser.
- Useful throw, spill, beam control, glare, visible lens images, and camera appearance.
- Results across dimmer levels, representative color mixes, battery states, and thermal conditions.
- Consistency across several units and replacement optical parts.
- Exact accessory part number, attachment, cleaning, and service instructions.
- Model-specific photometric and optical documentation rather than a generic LED-count claim.
Frequently Asked Questions
Are colored shadows caused by wireless DMX?
Normally, no. Wireless DMX affects data delivery, not physical emitter spacing. Fringes that move with the fixture, object, or wall indicate optical geometry. Confirm the control mode, then diagnose optics and distance.
Why does blocking red create a cyan shadow?
The region receives the green and blue light that was not blocked; additive green plus blue appears cyan. Blocking green leaves magenta, and blocking blue leaves yellow.
Does a higher LED count eliminate RGB color separation?
No. Evaluate count with spacing, grouping, package, optics, diffuser, aperture, and distance. Interleaving may help; separated zones can add shadow paths.
What is LED light mixing distance?
It is the distance needed for color distributions to overlap enough for a defined target and criterion. Test the exact fixture, optic, mix, object, surface, and camera.
Can a diffuser remove colored shadows completely?
It can reduce separation by increasing overlap and apparent source size, but may not eliminate every fringe. It can also lower peak intensity. Test the complete configuration.
Why are colored shadows stronger when a person is far from the wall?
Separated rays keep diverging after the person, so more wall distance spreads the offsets. Moving the person closer compresses them.
Are colored shadows the same as poor CRI or different colors at the same DMX value?
No. CRI describes object-color rendition; same-DMX mismatch compares fixtures or conditions. Colored shadows are a spatial occlusion effect, although several problems can coexist.
Related Articles, Products and Next Step
Use the color-system comparison to choose the required channels, the DMX color consistency guide to diagnose whole-fixture mismatch, and the CRI, R9, TLCI and TM-30 guide to evaluate color rendition. For coverage, optics, and diffuser effects on distribution, continue with the floodlight beam-angle guide.
The current LumiUp Aqua P6 page confirms an RGBWA+UV battery PAR format, while the LumiUp Flex PL18 Pro page confirms an eighteen-cell rechargeable panel format. Their published pages do not provide a measured colored-shadow threshold or mixing distance, so this guide does not claim one. Explore the complete LumiUp product range, then contact LumiUp with the fixture format, emitter layout, shortest source-to-person distance, person-to-wall distance, optic or diffuser, required color mix, camera setup, and output target for a sample-test plan.